
Today I will explain how to add automatically rows in InfoPath 2007 to a repeating table with c#. You can download the InfoPath form and modifiy the code for your personal use. The code will work within the InfoPath client or on a web enabled form.
This is just a short sample. When I created this code I used a webservice to request data from an Oracle database and filled the form automatically when the form was opened.
Preparation:
Install InfoPath 2007 Client
Install Microsoft Visual Tools for Applications
Before you start to prepare the form note that you need to be care when you rename controls. All controls what we use within the code behind file are case sensitive!
First we start to prepare the form
1) Create a new infopath form
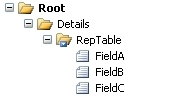
2) Rename the top element to „Root“
3) Add a „Repeating table“ element with three columns to the infopath form
4) Name the group element „Details“
5) Name the repeating table element „RepTable“
6) Type a name for each element („FieldA“, „FieldB“, „FieldC“)
7) In the repeating table properties within the tab „Data“ do not allow the user to insert and delete rows. You must uncheck the checkbox (default is checked). We do that because we want to add automatically rows to the repeating table.
The data source should look like this
We want to load data to the repeating table when you click a button. It is your choice to make an on load event or react on some input to fill the table
1) Add a button to the form
2) On right click go to „Button properties“
3) Write on the label „Load“
4) Write as ID „LoadRepData“
5) Click edit form code. When you do that InfoPath will automatically add the necessary reference to the code behind file to react on the button
6) click event.
The form should look like this

At this point we can start to code the InfoPath form. If you close the editor you can reach it if you click on the „Tools“ menu „Programming“ -> „Microsoft Visual Tools for Applications“.
Bind the navigator to the elements. Iterate the loop and fill the fields
XPathNavigator details = xPathNavi.SelectSingleNode(„/my:Root/my:Details“, NamespaceManager);
XPathNavigator repTable = details.SelectSingleNode(„my:RepTable“, NamespaceManager);
XPathNavigator node;
int counter = 0;
// iterate loop to fill table
for (int i=0; i<1; i++)
{
node.SelectSingleNode(„my:FieldA“, NamespaceManager).SetValue(„FieldA – Row “ + i.ToString());
node.SelectSingleNode(„my:FieldB“, NamespaceManager).SetValue(„FieldB – Row “ + i.ToString());
node.SelectSingleNode(„my:FieldC“, NamespaceManager).SetValue(„FieldC – Row “ + i.ToString());
details.AppendChild(node);
counter += 1;
}
Because that we clone the row we need to remove the last row
XPathNodeIterator rows = details.Select(„my:RepTable“, NamespaceManager);
XPathNavigator first = details.SelectSingleNode(„my:RepTable[1]“, NamespaceManager);
XPathNavigator second = details.SelectSingleNode(„my:RepTable[“ + Convert.ToString(rows.Count – counter) + „]“, NamespaceManager);
first.DeleteRange(second);
Isn’t that easy?
Download the InfoPath form here 
This code won’t work in InfoPath 2003. This is because Microsoft changed the object modell. Feel free to modify this sample code.
Timo